Saturday, April 6, 2013

Spring In A Jar

Ahhh, spring!  In our Wisconsin climate it's hard not to get excited about spring.  The temperature warms, the snow melts, the days get longer, the birds return, and the dormancy of winter comes to life.  For me, this past winter was a busy one which kept me from writing here and distracted me from my usual kitchen inspiration.

As the life energy of spring emerges I am reminded of the soul nourishing rewards of eating with the seasons.  After months of rich and heavy stews, meats, and casseroles the anticipation of light, fresh, green food is almost more than I can bare.  On a very basic level, eating seasonally keeps life interesting.  Just when you've had enough of one season's bounty, you can move on to enjoy the next.  It's a continuous cycle of anticipation, excitement, joy, & comfort.  What an amazing and easy way to cultivate gratitude in our lives.  Trust me, eating locally grown asparagus in the upcoming months will mean so much more to you when you DON'T eat it out of season the rest of the year. You will experience a joy you never knew existed in something so simple.

I typically gather a lot of inspiration, gratitude, and joy from weekly trips to our local farmer's markets during the growing season. Thanks to talented artisans, freezers, coolers, green houses, hoop houses, and hydroponics we are able to enjoy a still rich indoor winter market outside of that season.  A recent trip to our indoor Dane County Farmer's Market proved to be just the boost I needed to pull me out of my winter doldrums.  Winter spinach from Snug Haven Farm, mixed salad greens from Gitto Family Farm, fresh sprouts from Garden To Be, fresh herbs, and even tomatoes and cucumbers from Canopy Gardens had made their debut!  


The salad greens and sprouts I bought presented the perfect opportunity for me to tell you about my latest discovery...vacuum sealing greens!  Thanks to social media, I learned about using tools I've had in my kitchen for years, but have never used...the jar sealing adapters for my Foodsaver Vacuum Sealer.  People ask me often about vacuum sealers, whether or not I have one and whether or not I use it.  Yes I have one, yes I use it, and yes I think you should have one too.  It has been an essential tool in my long term food storage arsenal.  And now that I've rediscovered my jar sealing adapters I am looking forward to prolonging the freshness of everything I store in jars...e.g. dried herbs, dried vegetables, loose leaf tea, dried beans, and dried fruits.  See, my excitement has me veering off my point...which is vacuum sealing fresh greens to preserve their longevity in my fridge.

My first experiment with this was to do something similar to the salad-in-a jar post from a social media site.  I had red cabbage, green cabbage, onions, and carrots all in cold storage waiting to be eaten from this past fall.  A coleslaw definitely seemed to be in order, but instead of mixing the whole thing together at once and ending up with a soggy bowl of leftover slaw for the week, I kept the shredded veggies and dressing separate, only to be mixed a few hours before consuming.  As per the salad-in-a-jar idea, I put dressing in the bottom of a wide mouth pint jar and then stacked my slaw fixings on top.  I put together a few of these as lunch sides for myself through the week.  Then using my canning lids and the vacuum sealer I sealed them up tight.  When it was time for me to eat one of these jars, I set it upside down in the morning and then at lunchtime gave it a good shake.  Popped off the lid and enjoyed a lovely fresh coleslaw.  (Unfortunately I failed to take photos of any of this...please pardon the lack of pictures.)

For the remaining freshly shredded slaw veggies, I piled them into a large half gallon canning jar and sealed it up tight as with the pint jars.  Part of my experiment was to see how long I could hold this stuff in this way and keep it fresh.  My slaw mix also included some freshly chopped parsley just to up the ante a bit. I kept an eye on it so as to be sure to eat it as soon as it started to show signs of aging.  After two weeks, everything in the jar, including the chopped parsley, still looked beautiful.  I decided it was time to eat it anyway, as it was taking up too much space in my fridge.  I popped the lid and it definitely had an odor of aging cabbage, but everything looked and tasted great.

Clearly this was a very unscientific experiment, but I was impressed by the results.  I had a "control" bowl (of sorts) of shredded raw beets in a conventional bowl that I made the same day as the slaw.  The beets were grey and pretty unhappy looking after a week.  They were sacrificed to the compost bin.  I have since discovered a whole community of food-in-a-jar eaters and am looking forward to finding more fun food ideas. (I found a great blog post by Salad in a Jar with trouble shooting tips on vacuum sealing jars.)

I am currently trying this storage method on the fresh mixed salad greens and fresh sprouts that I bought last week at the farmer's market.  One week and so far so good!  When I consider how much money I spend on these locally grown fresh items, finding a way to prolong their storage makes me happy and saves me money. 


Other things that make me happy this time of year are all of the fun activities emerging in our community.  I have three exciting things to share with you for April (and forgive the short notice.)

SLOW FOOD MADISON ANNUAL MEETING
If you've always wondered what Slow Food Madison is about, what we're up to, where we're headed, and how you can play a part please come to our Annual Meeting tomorrow, April 7th, at Goodman Community Center.  The celebration is open to the public and will run from 11:00 am to 1:00pm.  We will have some talented local food producers sampling their wares from 11:00-11:30 and the meeting will run from 11:30ish - 1pm.

MADISON FOOD CAMP
 Madison Food Camp on Saturday, April 13th.  This event is put on in partnership with Slow FoodMadison and is super cool.  It's based on the idea that we don't need experts to teach us how to dothings for ourselves. We all have knowledge, talents, and experiences to share.  It's about neighbors helping neighbors, and in this case, the topics for learning revolve around food.  Raising bees, making beer, starting a garden, making yogurt, smoking meat and so much more!  The early bird price is sold out, but the standard price of $15 is still a crazy bargain.  Space is limited, so check it out and register today!   

"FARM FRESH & FAST" COOKBOOK PRE-SALE
 FairShare CSA Coalition (formerly MACSAC), is releasing an exciting new cookbook called "Farm Fresh & Fast".  FairShare is the publisher of the longstanding cookbook "From Asparagus to Zucchini", which is now in it's third edition.  "A to Z" has been my primary vegetable recipe resource for years and is at the top of my list as a gift I give to friends and family who are new to gardening or who are interested in healthier eating.  Not only is it filled with great recipes, but it also includes wonderful information and tips about each vegetable regarding harvesting, processing, and storage.  

In 2011 FairShare put a call out to the community for recipe submissions to be considered for their new cookbook.  A few months ago I was delighted to get an email telling me that the recipe I submitted for consideration was accepted and will appear in their new cookbook!  I was and am very excited.  As a contributor I recently had an opportunity to page through a mock up of the new book.  It is beautiful and full of even more amazing information.  They have come up with some great ways to help inspire us all to be more creative in our own kitchens.  And, even better, they've included food groups beyond vegetables in this book.  Including a cocktail section with submissions from some of the best mixologists in Madison!!  I am a huge fan of all that FairShare does for our community and family farms, and am already a huge fan of this new cookbook.  My recipe being published is just icing on the cake.  FairShare is offering a pre-order discount of the new book for $20 (30% savings), but the offer ends April 15th...so order yours now!!  You won't be sorry.  


What's up next for me?  My favorite spring vegetable is wild ramps, and my bucket list includes learning how to forage for my own.  Maybe this will be my year!  What food item are you looking forward to most this spring?  And, have you ever gone foraging for your own?

  Book Give-Away
As a thank-you for reading and sharing my blog with others, I'd like to give away a copy of FairShare's new cookbook, "Farm Fresh & Fast".  Post a response below to my question above and I'll draw a winner when the book is released, hopefully in May.  (And, if you order a book, but then win one here...don't fret, you will then have the perfect gift for someone special in your life!)


Saturday, November 24, 2012

Teach a Man to Fish....

I hope you all had a wonderful Thanksgiving holiday filled with family, friends, traditions, good food, and gratitude.  Gratitude is a skill we can all use practice in cultivating.  It has an amazing way of drawing even more goodness in to our lives.  I am grateful for many things, and in my passion for food I am grateful for the opportunities that abound in the Madison area for learning how to make good food in the comfort of my own kitchen.  

Most of us are familiar with the proverb, 
"Give a man a fish and you feed him for a day.  Teach a man to fish and you feed him for a lifetime."   
Cooking is akin to fishing in this case and is a skill not to be underestimated.  How many times have you been intimidated out of preparing a healthy, delicious, low cost meal for yourself?  Or said, "I don't like to cook," when really you mean "I don't know how to cook."  None of us enjoy doing something we don't know how to do or feel intimidated by. When done mindfully and sustainably, the benefits of cooking for yourself and others are deep and far reaching.  Not only does it save you money and keep you healthy, but it also fosters relationships, improves your local economy, and serves the land, water, and animals around you.  

I am often asked if and where I like to take cooking classes.  My answer is, "Of course" and here is a list of the "where" that are available to all of us!

In Madison
  • Offer an array of season appropriate classes in their community rooms. 
  •  In addition to learning how to cook American and ethnic dishes, the classes cover a wide range of topics such as meal planning, shopping on a budget, alternative eating styles, and nutritional coaching.  
  • They offer a lot of classes that teach you how to really "do it yourself," like basic canning, fermentation (think kraut & yogurt), planting seeds, garden planning, raising backyard chickens, baking bread, and making cheese.  
  • The classes are always taught by professionals or members of the community who have developed an expertise in the particular field of learning.  
  • Classes are very affordable and are open to members and non-members alike.  
  • Periodically check the co-op's website to see what classes are coming up, or if you become a member owner you will get their monthly, The Reader, newsletter which lists all upcoming classes in addition to other great articles and information.  

Orange Tree Imports:  Orange Tree Imports 
  • A lovely specialty shop that has been a staple in Madison for over 35 years.  Even if you aren't interested in the classes, Orange Tree's unique offerings of specialty gifts and culinary products make it worth a visit.  
  • Cooking school classes are very popular and fill up quickly.  Their former method for signing up, which included deadlines and a lottery system, has given way to a first come first served online registration.  
  • Class lists are released on a quarterly basis and although you can periodically check their website for updates, I recommend simply getting on the list to receive their e-newsletter so you don't miss your opportunity.  Classes for the winter session (which starts Jan. 9th) were just released on Nov. 19th and some are already full.  
  • Orange Tree classes are a little more upscale, usually include a glass of wine, and always include a 10% shopping discount throughout the store the night of the class.  
  • They don't offer any real DIY classes, but you do learn how to make some delicious and impressive dishes as well as meet local celebrity chefs, food experts, and store owners...as these folks make up the ever changing group of class instructors.  

The Kitchen Gallery:  Although they don't yet have their class kitchen built, it is in the plans for The Kitchen Gallery to one day offer cooking and DIY classes.  As another locally owned specialty kitchen store I feel it necessary to mention them.  The owners are lovely people who care very much about their community and local food system.  Their store is worth a visit the next time you are downtown and keep checking their website or sign up for their e-newsletter for updates on classes.  

Underground Food Collective:   Underground Food Collective 
  • The fantastic hands-on meat based classes they have long offered now fall under the Underground Meats umbrella.  Their classes are not for the faint of heart and are for people serious about learning how to build a relationship with their food.  
  • Underground offers a wildly popular Whole Hog Breakdown Class where you get to learn how to break down your very own hog then take home all of the cuts you created to stock your freezer.  Truly "teaching a man to fish...."  
  • I haven't found a consistent and reliable method for keeping up to date on Underground events.  They do offer an e-newsletter and can be found on Facebook, in addition to checking in on their website periodically.  
Did you know you can save yourself some serious cash on the healthiest most sustainable meat around, if you buy it in whole pieces and learn how to do some basic butchering yourself?  Boned chicken breasts and thighs cost significantly more than bone in cuts, or better yet than a whole chicken (on a per pound basis).  Save some money and buy that locally, organically, sustainably raised chicken by taking it home and parting it out yourself.  (Just to be clear this doesn't mean you have to dispatch and dress the animal...it comes to you dead and ready to go.) 

One of my most favorite classes with Underground was a Duck Butchering class where we each got our own duck and then were walked through properly cutting it in to all the useful pieces we recognize.  We then learned how to cook said parts.  We were treated to so much food, instruction, and take home meat that is was the best money I had spent in a while.  


FairShare CSA Coalition (formerly MACSAC) & Fitchburg Fields:  For the ultimate in DIY and seasonal cooking classes, particularly instruction on how to manage the sometimes overwhelming bounty of your CSA share, FairShare and Fitchburg Fields are your answer.  
  • FairShare's classes begin in June and go through the growing season.  Their classes are now long over for the year, but keep them in mind next year as you begin your summer food planning.
Fitchburg Fields also offers classes appropriate to the time of year and only during the growing season.  
  • Their offerings extend beyond cooking and preserving to include gardening workshops as well.  
  • This is a grass roots organization run by a group of passionate people who are dedicated to the promotion of  sustainable living and regionally based food systems through education and hands on learning.  
  • You can visit their website, sign up for their e-newsletter, or follow them on Facebook to keep abreast of all they have to offer or to get involved. 

Slow Food Madison:  Slow Food Madison   
  • Offer an ongoing variety of local store and food producer tours, and periodically offer DIY classes on a variety of subjects.  
  • Are currently working on putting together a very special French inspired cooking class series. 
  • Check their website, sign up for the e-newsletter, or follow them on Facebook to keep up with what's coming next.   

Whole Foods:   Whole Foods 
  • Although a corporate chain in the natural foods category, they offer a nice array of classes.  Though I'm not sure that they offer the same level of DIY type classes, they do offer a selection of kid's cooking classes
  • Whole Foods classes can be found on their website as well as in a flyer available for pick up at each checkout aisle.  
Outta Town!
Dining Room at 209 Main:  Ready for a trip to the country?  Been wanting to explore some of our area's small towns?  The Dining Room at 209 Main in tiny Monticello, WI, is the perfect excuse to do just that.  
  • Monticello is located about 30 miles south-west of Madison, and just 5 miles south of beautiful New Glarus.  Wave Kasprzak and Jane Sybers are the husband and wife duo who own and run this fantastic upscale restaurant in the middle of nowhere.  If you haven't yet made the trip to Monticello to dine with Jane & Wave, put it at the top of your dining "to do" list.  
  • Jane & Wave offer cooking classes January through March.  
  • These classes are uber-popular with folks who are in the know and I'm experiencing one of those tough situations where when you find something wonderful, you want to tell everyone about it, but all the while know that in so doing, it's going to make it more difficult for you to participate.  
  • Wave's classes are intimate small groups, always include wonderful wines (courtesy of sommelier Jane), and fill up VERY quickly.  
  • In this case you must be on the mailing list to be notified of the upcoming class roster...which should be coming out any day!
  • Wave also offers custom private cooking classes for small groups if that is a better fit for your schedule or needs.  I can think of many ways a cooking class like this could be a unique way to celebrate with friends and family.  
  • And, if you are already a fan of his cooking, Wave put out a cookbook last year that is filled with fantastic recipes you can recreate at home.   
The highlight of Wave's class roster is the Chef for a Day offering.  
  • It is the ultimate in cooking classes and is the one I've participated in most ardently.  It involves a full day of meal preparation in a very small group followed by a delightful multi-course dinner (that you spent the day preparing) complete with accompanying wines.  It is a spendy proposition, but worth every penny and is so much fun.  


All Through the House:  All Through the House 
Another lovely specialty shop located in nearby Stoughton, WI.  I have been to the store, but have never taken a class.  I have always heard nice things, which is why I'm including them in my list. 
  • They offer a fun variety of classes (including some DIY), often offer wine samplings, and include a shopping discount at the store.  
  • They also have a beautiful set up for observing the classes.  Guests sit at a comfortable bar that over looks the cooking area.  Easy for viewing and eating!  
  • Again, the classes at ATtH are very popular and fill up quickly.  They are currently working on their next session of classes, so if you want to be kept up to date sign up for their e-newsletter.  For a look at what was offered this last session click here.
 
So there you go.  I'm sure there are some that I don't know about or have forgotten, but this is a pretty substantial list and now you have no more excuses.  Cooking can be fun, and learning how to do it will go a long way to helping you enjoy the process.  If you already enjoy cooking, all of the above places will offer you a way to hone your skills or break out of a rut.  If you have a favorite cooking class experience or want to share a place that I've missed, please tell us about it in the comments!  I love hearing from you.

All my best to you as we move in to a very busy holiday season.  Remember to stop and take a breath, enjoy the moment, and keep your focus on the important things in life...family, friends, and good food. ;)

Monday, October 29, 2012

For the Birds...Or Is It?

With my garden put to rest and the craziness of summer winding down I've finally found some time to get back to putting "pen to paper", so to speak.  Recently, the rituals of preparing for winter in this part of the world put me on a quest for beef suet.  Not a usual item on the "to do" list for most, this is a necessary ingredient for readying my food stash to keep our wild birds fed over the impending winter months.

In an effort to be more economical and I guess to be more "homemade", I started making suet cakes for my yard birds a couple of years ago.  This year I learned something new, so thought it might be fun to share.

What I know...
Being an avid consumer of pork, I am very well acquainted with lard.  The succulent and versatile product that results from the rendering of pork fat.  If you wonder why you can't get your pie crust to be quite as good as grandma's, try using lard instead of shortening.  Want killer pan roasted potatoes?  Use lard instead of oil.  Lard from sustainably raised pigs on a natural diet is actually a more nutritious fat than most think.  Much of the horrors associate with animals fats over the past few decades have been overstated and are now known to be more associated with the overly processed vegetable fats that were encouraged as substitutes.  If you're interested, here is a great article from Food & Wine and blog post by The New Homemaker that speak to the misunderstandings associated with lard.  Another example of how staying as close as possible to Mother Nature's intention for our food, is always the better choice.

What I learned...
As the name would suggest, Suet Cakes, call for suet.  Lard is from pigs, and Suet is from cows.  When suet, the fat from beef, is rendered, the resulting product is called tallow.  Tallow is beef's version of lard. I discovered that tallow, something I had never really heard of, is also a succulent and versatile cooking fat in the same way lard is.  And, like lard, if sourced from a sustainably raised animal on a pastured diet, it is far more nutritious than most would think.  (Just so we're clear, I'm speaking about these fats like I would of any...always in moderation and they are only a good alternative if you trust the source and know what the animal was eating.  Lard and tallow from commercially raised, corn fed animals that you buy already rendered at your local chain grocery store...NOT a good choice.)

This year I got my suet cake recipe from my step-dad's 94 year old mother, Ruth.  She has been making suet cakes for far longer than I, and she insists that although you can make suet cakes from lard, using suet is better and holds up to warmer outdoor temps.  In an effort to do it the "right" way this year, I went in search of some beef suet.

My sources...
All of my trusted beef sources, Marr Family Farm, Fountain Prairie Farm, and Jordandal Farms, were able to hook me up.  I ended up procuring 7 pounds of suet for $9 at our Saturday morning farmer's market. I shared my suet bounty with Ruth and came home with 4 pounds to get started.  And let me say that 4 pounds of suet goes a very long way.

4 pounds of beef suet


 Let's render...
When starting with raw fat you must first remove any un-meltable solids and impurities by rendering.  Rendering can be done a couple of ways, but the key is that it must be done slowly at a low temperature to avoid burning.  The smaller the pieces of fat, the faster the process.  Some sites even suggest shredding the fat or putting it through a food processor.  Ruth suggested that cooling the tallow after rendering, until solid, and then melting it again makes the final suet cakes even hardier in warmer outdoor temps.

Cut in to smaller chunks...though smaller than this would be better

In a large pot for rendering at a low temp

Suet beginning to render..."melt" in to a liquid

After 2 hours, liquid is nearly completely extracted from solids

Straining remaining solids from tallow

 With my new recipe calling for just 1 pound of suet (which equated to 2 C. of rendered tallow), I decided to save the remainder of the tallow for myself to use for cooking.  It stores nicely in small jars in the refrigerator and can even be put in the freezer for longer term storage.  It has a fabulous meaty aroma and I can't wait to use it.

Tallow set aside for consumption...beautiful golden color
 So let's make cakes!!
(Scroll to the end for the full recipe)

 1.  Melt lard or Tallow (remember the option to do this twice if you choose) in a large pan.  (Raw pork or beef fat must be rendered first to a meltable fat...lard or tallow...see above)

Solidified tallow for cakes set to be reheated for final assembly

Solidified tallow for consumption ready for refrigerator
2.  Remove from heat and add remaining ingredients, stirring well to mix each ingredient as it's added.
3.  Mixture should be slightly looser than cookie dough.  If it is too loose, add a touch more flour or cornmeal.

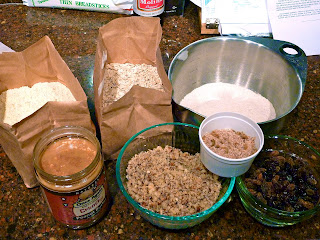
The recipe calls for crunchy peanut butter, whole wheat flour, old fashioned oatmeal, corn meal, and optional items such as nut meats, currants, and raisins.  I added some walnuts that had been lost in a cupboard for who knows how long, raisins, and mealworms that I picked up at the local pet store.

Ingredients for Suet Cakes...including ground walnuts, raisins, and mealworms

meal worms

4.  Spread mixture in a 9x13 or jelly roll pan.  You could also take the mixture at this point and put it in to any form that will fit your feeder.  It could even be put in a regular container from which you could take scoops to fill onion sacks or netted suet feeders.

Suet Cake mixture ready for pressing in to pans


Pans ready for refrigeration
6.  After cooling, suet can be cut in to cakes and stored in ziplock bags or other containers for easy access.  They should be kept refrigerated or frozen until use.
Cut cakes going in to bags for storage

This recipe should keep you in suet cakes for a while, but it depends on how many birds you get and how hungry they are.  I got approximately 10 cakes that are the size of the commercially sold cakes.
I rendered the suet and assembled the recipe in one afternoon.  After letting the batch chill overnight, I was able to fill my feeder the next morning and store the rest away to use throughout the cold winter months.

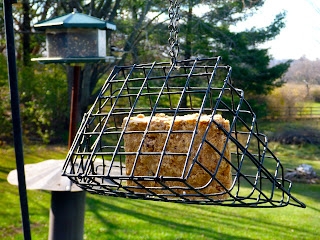
Feeder loaded with new Suet Cake!
Bird Suet Cake Recipe 
(this recipe is from an unknown original source and has been passed down through neighbors and friends over many years)

1 lb lard or suet, rendered, or you can buy tubs of rendered fat at some grocery stores or butcher shops, you can also find plain suet cakes at some pet stores 
2 C. crunchy peanut butter
2 C. whole wheat flour
4 C. old fashioned oatmeal
4 C. corn meal
optional: nut meats, currants, raisins
9x13 pan

1.  Melt lard or Tallow (remember the option to do this twice if you choose) in a large pan.  (Raw pork or beef fat must be rendered first to a meltable fat...lard or tallow)
2.  Remove from heat and add remaining ingredients, stirring well to mix each ingredient as it's added
3.  Mixture should be slightly looser than cookie dough.  If it is too loose, add a touch more flour or cornmeal.
4.  Spread mixture in a 9x13 or jelly roll pan.  You could also take the mixture at this point and put it in to any form that will fit your feeder.  It could even be put in a regular container from which you could take scoops to fill onion sacks or netted suet feeders.
5.  Place pan or container in the refrigerator, cold porch, or garage for a few hours or overnight.
6.  After cooling, suet can be cut in to cakes and stored in ziplock bags or other containers for easy access.  They should be kept refrigerated or frozen until use. 

Storage...
I store my cakes in a hard plastic container in my unheated garage during the cold fall and winter.  It's important that if you are going to store this stuff outside, that you properly protect it from other critters who can't resist the delicious aroma of peanut butter and fat. They WILL chew through ziplock bags...trust me.

Chickadee already enjoying his/her new treat!

Saturday, August 18, 2012

More of Summer in the Raw!

It seems like I am long overdue to offer a little inspiration.  I'm sure your summer has been as busy as mine and time seems to just fly right by.  Thanks to some much needed rain and cooler temps we are moving in to what is shaping up to be a lush harvest season.

Of all the great vegetables piling up at the farmer's markets, one of my least favorites is summer squash (which includes zucchini).  I welcome being treated to slices of warm zucchini bread and cakes, when generously made by friends, but the seemingly endless supply that shows up in my CSA box and from my own garden (don't ask) makes me a little crazy.  I'm always on the search for new ways to hide it in a dish or turn it in to something interesting that doesn't involve breading and a pan of hot oil.

This year I did just that and am excited to share it with you.  Going back to my foray in raw food, I remembered reading something about making raw "noodles" out of summer squash.  The problem, however, was that it seemed you needed a special piece of equipment (a spiralizer) to cut the vegetable in to long noodle-like strands.  As many of my friends can attest, I am a kitchen tool junkie, but this is something I really didn't want to buy unless I knew I would enjoy eating said "noodles".

After a quick google search I learned I could use a Julienne Peeler instead of a spiralizer.  (A knife can also be used, but I was not interested in spending the time it would take to cut up a bunch of squash into strands by hand.)  Well, this kitchen tool junkie has a julienne peeler, so I was in business.  And the results were so good, I've been spreading the word ever since!

Making Summer Squash Raw "Noodles" is quite easy with a julienne peeler. 

  •  Wash the squash. (1 large squash makes about 2 servings)
  • Carefully run peeler down length of squash covering all sides until you get to the seedy center.
  • Gently separate strands with your fingers.
  • Toss strands in a bowl with a small splash of olive oil and they are now ready for your favorite sauce!  


It really is that easy!  And, hello...nutritious, refreshing, and fun!

The noodles definitely give me the mouth feel of eating al dente pasta.  The longer you let them sit (they will last a few days in the fridge), the softer they will start to become but they never got mushy.  So far I've tried these "noodles" a couple of ways and have loved them each time.

I am a Tomato Basil Pesto freak.  I make batches (a soon to come project) that I freeze in small containers to use throughout the year.  This was the first sauce I tried on my noodles.  If you're interested I'd be happy to share my recipe or you can find your own online or in your favorite cookbook.


The second sauce I made tonight, and it was delicious!!  Another great way to use up a lot of your CSA veggies this time of year is to make Ratatouille.  In case you missed the Disney movie, Ratatouille is a peasant dish from France and although there are complex ways of making it with fancy layers and creamy sauces, I'm used to a very simple method of dicing all the vegetables and sautéing them in a pan until just cooked through.  Although this is a great way to use a lot of fresh summer veggies, it's a dish that I can only eat once.  So when I made it the other night, for lack of time and creative energy, I ended up with a large amount of leftovers that I was less than excited about.

Tonight those leftovers were transformed in to a fantastic sauce that I used on some squash noodles.  Here's what I did:
         Fresh "Ratatouille" Pasta Sauce
1.  1 batch of leftover ratatouille.  There are a lot of recipes out there, including a nice one in the "From Asparagus to Zucchini" cookbook.    
2.  1 large garden fresh tomato, cored, halved, seeded, and further cut in to chunks
3.  1 large clove of fresh garlic, thinly sliced (use less if you don't like a nice garlic kick)
4.  1/2 jar oil packed sun dried tomatoes (just the tomatoes, not the oil)

  • In a blender or food processor, roughly puree the garlic, and tomatoes (fresh and sun dried).
  • Add the ratatouille (in this case it was cold) and process in to a chunky sauce. 
  • Pile the noodles on a plate and top with a heavy dollop of your fresh sauce.
  • Enjoy as a refreshing, cold, summer pasta alternative!  (Though the sauce could be heated and enjoyed warm)


I hope you give this a try and enjoy a new way to savor summer squash and your favorite pasta sauces. 

I would love to hear your creative ideas for using summer squash!!  

Monday, July 9, 2012

A Little Blue to Brighten Your Day.

As I was getting ready to put together one of my more favorite breakfasts, it struck me that I should be sharing this with all of you!  Especially now that fresh blueberries are gracing the stands of local farmer's markets.

This bowl of deliciousness is a snap to prepare, is nutritious, and will keep you feeling satisfied well in to your day.  I can't think of anything better than that!

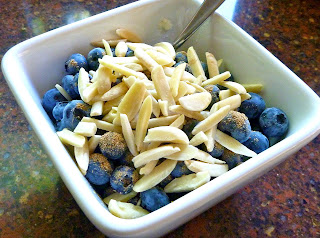
There isn't even a title for the recipe.  If you have a clever idea let me know. :)  Here's what's in it:

1.  Butler Farms sheep's milk ricotta cheese 
(also can substitute cottage cheese or another ricotta)
2.  fresh lemon zest
3.  REAL Maple Syrup
4.  fresh blueberries
5.  sweet Churna sprinkle
6.  slivered almonds

So let's talk about the ingredients a bit and put breakfast together:

1.  For one serving, put half of a container of Butler Farm's ricotta cheese in a bowl.  Her containers look to be about 8 oz. 


Butler Farms is the first licensed Grade A Sheep's milk dairy in the U.S. and is located in Whitehall, WI.  Proprietor, Janet Butler was an early member of Wisconsin's elite group of women cheese makers, a group that is growing in number every year.  She runs a specialty organic farmstead operation and does so in a very quiet manner.  She has no website, no prestigious marketing plan (her cheeses speak for themselves), and no ambition to grow her farm beyond its current humble size.  The only location I am aware of to purchase her cheese in our area, is at the Dane County Farmer's Market (She has a small table with an awning along E. Mifflin St. on the capitol square.)

Though she makes a variety of unique and interesting cheeses, including one of the only local camemberts, I have fallen in love with her ricotta.  It is creamy, with a light crumble, and deliciously mild with the sweetness only fresh milk can impart.  Yes, I could buy other brands of ricotta at most grocery stores (and I do during the winter months), but why would I when I can get this fresh, local product all summer long?  Because this cheese is so fresh and natural, it does not have a long shelf life.  Plan to eat it within a few days, or freeze it.

Janet only brings to market what she can sell in a day.  If she sells out of her ricotta before you get there, pick up another one of her cheeses to enjoy, then head to the Murphy Farms stand on Carroll St. and pick up some of their cottage cheese which makes a nice substitute.  Murphy Farms also has a stand at the Westside Community Market on Saturday mornings in the DOT parking lot.


2.  Zest a quarter of one fresh lemon over your bowl of ricotta cheese.  


The important thing about using the zest of any citrus fruit is that you only want the colored portion of the rind.  That's where all of the delicious oils are.  The white pith part of the rind is bitter and is not what you want in any of your food or cocktails.  If you don't have fresh lemon, Penzey's dried lemon zest could be substituted, but you'd want it to have been softened.  You could do this ahead of time by mixing a 1/2 tsp of the dried zest in to your small container of ricotta and letting it sit over night.  

3.  Drizzle a tablespoon or so of real maple syrup over the top. 


Please, for the love of all things holy, if you don't have real maple syrup in your pantry, dispose of the imitation liquid that you do have and pick up some real Wisconsin Maple syrup.  If you read the ingredients on your imitation syrup you may be shocked to see that it contains NO actual maple syrup!  You can find real maple syrup everywhere, including nearly every farmer's market in the state.  This was a rough year for maple syrup harvesting due to the warm winter and early spring, so supplies may dwindle sooner than later.  Yes, real maple syrup costs more than the "lite" chemical concoction sold as maple syrup in most grocery stores, and it should.  It takes a lot of love and work to get the sweet sap from the trees in to a bottle on the shelf.  And in addition to that, it is a nectar produced by Mother Nature that not only tastes better than artificial syrups but is a much healthier option.  You don't need "lite" maple syrup.  The real stuff has so much flavor you won't need to use nearly as much of it and the complexity of the sugars make it an easier load on your body than the corn syrup found in the artificial variety.  I buy Grade B syrup as it is less refined and has even more punch of flavor and color.

4.  Top with as many fresh blueberries as you can stand!  I use a 1/2 C. or so.  

Blueberries are in season right now, yeah!  I LOVE blueberries.  And, this time of year I enjoy as many as I can fresh, but I also freeze many pounds of them in pint bags so I can enjoy them all year round.  Blueberries are not only delicious but they are also nutritious.  They are loaded with fiber, vitamins, and flavonoid antioxidants (those molecules of immune boosting fame).  Don't wash your berries until you're ready to eat them and store them in an airtight container in your refrigerator.  If you are looking to save yourself some money you can pick your own blueberries at The Berry Farm in Baraboo, WI.  They have very limited picking hours so be sure to check their website before making the drive.

5.  Sprinkle on a little sweet Churna.

Okay, so this is kind of "outside the box" but it's a seasoning mix you'll love keeping on hand.  If you're not in the mood, you can just sprinkle your berries with a little cinnamon...though it won't have quite the same impact.  Churnas are a blend of spices used in Ayurvedic cooking to stimulate different characteristics in the body and bring balance to our doshas.  Sound like I'm speaking another language?  Well, that's because I am.  Ayurveda (ay-er-vay-da) is an ancient form of medicine from India that treats the body, mind, and spirit based on natural principles and innate characteristics.  Therapies aim to bring balance to these forces within the body.  Much of Ayurveda's medicine is in the form of the food and beverages we consume.  I use a Vata/Kapha sweet Churna when it's cold outside and a Pitta sweet Churna now while it's hot.  These spice mixes are delicious and can be added to nearly anything you would want to add a bit of sweet spice to.  The below Churna recipes come from Patty McCormick, a local Ayurdedic practitioner and educator.

Vata/Kapha sweet Churna:                                                Pitta sweet Churna:
8 parts cardamom                                                               2 parts cardamom
2 parts ginger powder                                                         1 part cinnamon
1 part cinnamon                                                                  1 part dried mint
                                                                                             1 part dried fennel

6.  Finish it off with a hefty helping of slivered almonds.

And if you want to keep it local, use some of the local hickory nuts you can by at the Dane County Farmer's Market.  God bless the sweet souls who still collect, crack, and clean the tasty morsels so we can have a local source for these special nuts.


Relax and dig in!!


Tuesday, July 3, 2012

It's Not Easy Being Green.

Over the years I've heard many friends express their frustration at not knowing what to do with their CSA vegetables week after week.  I will admit that as much as I love the veggies fresh from my garden and those from my CSA box, I too struggle with creative ideas on how to use up the fresh bounty before it goes bad.  And although some of us have our "go to" dishes, it's easy to get stuck in a rut.  Here are some of the things I've been doing with the beautiful greens (Kale, Collards, Swiss Chard, and Beet Greens) I've been getting in my CSA box for the past few weeks.

Although all of these greens have a slightly different flavor and texture profile, a nice thing about them is that most can be used interchangeably in many recipes.  Here's a little of what I know, and how I've been enjoying these nutritious delectables.

Kale
Red Russian & Lacinato Kale
You will find many different varieties of kale at farmer's markets and grocery stores.  The most common varieties I see at our local markets and in my CSA box are Russian Red Kale and Lacinato Kale.  It is a sturdy green that requires a more gentle cooking technique and longer cooking time to ensure that it ends up tender.  That said, it can also make a beautiful salad in its raw form when thinly sliced (watch here to learn how to chiffonade) and given time to marinate in a vinaigrette.  One of the most important things to know about kale is that before you do anything with it, you must remove the fibrous stem/vein that runs from the stem up the middle of each leaf.  It may seem tedious, but your dinner guests will thank you.

I recently made this kale salad with rave reviews.  It was inspired by a recipe posted on "A Spicy Perspective" blog for Grilled Ham Steaks with Southern Kale Salad.

Smoky Kale Salad
1 bunch Red Russian Kale, stems & ribs removed, leaves halved
3/4 C. coarsely chopped Almonds
1 Tbls rendered bacon grease or pork fat (you can use butter if you want, but you won't get the same flavor)
hefty pinch chipotle powder
hefty pinch smoked paprika (NOT the same as regular Hungarian or sweet paprika)
pinch sea salt
1/4 C. scallions or spring onions- finely diced
1 Kohlrabi, peeled and grated/shredded


Vinaigrette
1 Tbls Orange Zest
2 Tbls Rice Wine Vinegar
1/4 C. good quality Extra Virgin Olive Oil
1 Tbls honey
1 tsp onion powder
1/2 tsp granulated garlic (powder)
1/2 tsp sea salt
1/4 tsp fresh ground pepper


1.  Stack kale leaf halves and thinly slice into shreds (chiffonade cut).  Place in salad bowl add scallions and Kohlrabi.
2.  Make vinaigrette by whisking together listed ingredients, pour over kale and toss well. Let this sit for 45 min to 1 hr, tossing periodically, so kale softens.
3.  In a small skillet melt fat over medium high heat, add almonds and seasonings. Shake pan over heat to roast nuts evenly until lightly golden....be careful not to burn.  Remove from heat and set aside.
4.  When ready to serve, toss kale one last time, sprinkle smoky almonds over top and serve.  

Collard Greens
Collard Greens
This is always a tough one for me.  The classic thing to do with Collard Greens is to make them southern style, stewing with smoky ham/bacon.  When some smaller tender leaves showed up in my CSA box recently I wanted to do something different with them.  I remembered seeing something in one of my raw food "cookbooks" (an interesting lifestyle I investigated a couple of years ago) about using Collard Greens as a sandwich wrap.  The recipe I found looked pretty unusual, but I wanted to give it a try, and the results were surprisingly good.  These wraps got happy reviews from my taste testers.  I enjoyed their fresh flavor and nutritious features so much that I made them again last week.  They could easily be used whole as a lunch or picnic item or maybe even sliced and layered on a tray as a party appetizer.

(If you are interested in sticking your toes in the Raw Food kiddie-pool, I recommend this cookbook..."Ani's Raw Food Kitchen" by Ani Phyo.  It has many fun, easy, and tasty things to try.  And, with all of the fresh produce at our disposal, this is the perfect time of year to check it out.)  The recipe below is based on the one found in Ani's book, but I've listed it with my changes.

Italian Herb Collard Wraps
Italian Herb Collard Wrap         
Sunny Dill Cheeze
2 C. sunflower seeds, just the meats, not the whole seeds with the shells
Juice of 1 lemon, about 2 Tbls
3 garlic cloves
1 bunch fresh dill (I used about 1/4 C. fresh fronds)
1/2 bunch fresh rosemary leaves, chopped (I've only had dried available, so used 1 tsp dried)
1 bunch fresh oregano leaves, chopped (I used approx. 2-3 Tbls)
1/2 C. water
(I added a pinch of salt as I used unsalted sunflower seeds)


1.  Blend seeds, lemon juice, garlic, and herbs until smooth, adding water as needed to make a creamy texture.  Set aside.


Fillings (prep fillings only as needed to make wraps at time they will be eaten)
1 bunch scallions, chopped 
3 Avocados, sliced individually as needed (I used approx 1/4 of an avocado per wrap)
2 tomatoes, sliced and halved
Sun dried tomatoes packed in oil, sliced (I used 1 lg or 2 small tomatoes per wrap)


Collard Green leaves, ribs removed and leaves halved (prep each leaf only as you are ready to eat it)                                  


1.  Spread 1/4 C. or so of Sunny Dill Cheeze over dull green side of leaf, dark green side of leaf should be facing down
2.  Sprinkle with chopped scallion.
3.  Layer sun dried tomato strips, a few avocado slices, and half a slice of tomato on one end of leaf.  Roll leaf around fillings from end to end into a tight cylinder. (cut edge of leaf on one end and raw edge of leaf on other)


Wraps will keep for one day in the refrigerator.  Wrap in a paper towel and store in an airtight container.  The collards will not get soggy, which is why they make such a great sandwich wrap.

Swiss Chard
Most of the Swiss Chard we see at the market is the rainbow variety.  It is really beautiful with shiny dark green leaves and bright multicolored stems.  The nice thing about chard is that, although you still have to remove the stems and veins, they aren't as fibrous as the other greens and thus are edible.  Because the stems are still more fibrous than the tender leaves, they must be chopped and cooked longer than the foliage.  Chard has a more earthy flavor than Spinach, but it can easily be substituted in nearly any dish that calls for spinach.

Beet greens
No more tossing the leafy greens at the top of your beets in to the compost bin!  They are edible and very nutritious.  The greens from Chioggia (Key-oh-jhah) beets are more tender than those of your typical dark red varieties.  All beet greens have an earthy flavor similar to that of the beets themselves.  A fun and easy way to enjoy beet greens is to sauté them and toss them with a vinaigrette to enjoy along with the roasted beets.  Like Spinach, beet greens can often be gritty so be sure to soak them in cool water and rinse well before preparing.

Ultimately, when I am short on time and motivation, my "go to" dish for greens and many other vegetables, is Quiche.  The inspiration for the recipe that I use comes from "Don't Panic, More Dinner's in the Freezer" by Martinez, Howell, & Garcia.  I always make a batch that will make two quiches.  One to eat right away and one to go in the freezer.  I can use the frozen quiche for a later meal or last minute for a party, picnic, or to give to a friend or neighbor in need.  Quiches are so versatile and can be enjoyed for any meal of the day.  Here is the quiche I made last night.


Quiche
I box frozen fresh pie crust, 2-9 inch pie crusts, thawed & unbaked (This is definitely a place where I cheat. Pie crust is really pretty simple to make, but I always keep a box or two of these on hand in my freezer. Immaculate Baking Company makes an "all natural" product that Willy St Co-op sells.)
2 C. chopped bacon; sausage or chicken would also work (I recently found an exciting treasure at Willy St. Co-op...Willow Creek Farm sells their bacon ends in packages that they label as Lardons.  A less expensive option for WCF's awesome bacon when you want to use it for something other than eating in slices)
1 bunch each, chopped beet greens and swiss chard (chard stems chopped separately)
1 lg onion, diced
5 garlic scapes, chopped
1/4 C. chopped fresh basil
1/4 C. chopped fresh dill
8 eggs
1 C. whole milk (you can also use 1/2 & 1/2)
3 Tbls fresh lemon juice
2 tsp salt
1 tsp pepper
pinch of nutmeg
3 C. shredded swiss cheese or mozzarella cheese (I cleaned out my cheese drawer and combined some Edelweiss swiss, Marieke garlic-onion gouda, and Carr Valley Chèvre au Lait...I LOVE the name of this cheese!)
oil for sautéing


1. In a large skillet heat 1 Tbls cooking oil over medium heat, add chopped bacon and cook until beginning to brown.
2.  Add onions, garlic scapes, and chard stems.  Continue to cook until soft and beginning to turn golden.
3.  Add greens and fresh herbs.  Toss in pan frequently until greens are tender.  Remove from heat and set aside to cool.
4.  Place pie crusts in two 9 inch pie pans, fluting the edges.
5.  Thoroughly whisk eggs, milk, lemon juice, salt, pepper, and nutmeg in mixing bowl. 
6.  Spread cooled meat-veggie mixture in bottom of crusts, dividing equally.  Sprinkle with equal amounts of cheese.  Pour egg mixture over top equally between both pies.
7.  If baking, place in pre-heated 375 degree oven and bake for 35-45 minutes or until center of quiche is just set.  If crust begins to over brown, cover edges with aluminum foil.  Remove from oven and enjoy.
8.  If freezing, cover quiche with plastic wrap and then aluminum foil.  Carefully place unbaked quiche on level surface in freezer.  When fully frozen, wrap tightly, label, and return to freezer.  When ready to eat, thaw completely in refrigerator and bake according to above directions.  You can also freeze quiche after it's been baked.

**A couple of important tips on storing your greens.  Do not wash them until you are ready to use.  I wrap mine in a paper towel and place in a plastic bag for storing in the refrigerator.  I can often store these hardier greens like this for almost two weeks before they begin to yellow and wilt.

I hope this helps liven up your kitchen a little and gives you some fresh ideas for using the wonderful greens that have been filling your market bags and CSA boxes.  While I'm at it, I have to give a HUGE thank you to my CSA farmer, Kyle Thom, of Roots Down Community Farm, and all of the other farmers out there who are working tirelessly in these extreme weather conditions to make sure we have beautiful, local, healthy food for our tables.  I can't express my appreciation enough for what you do.  I also want to thank my dear friend, Jenny Liska-Boyer and her boys, Dylan and Parker, for their help this summer getting the hard work done in my own garden.

Dylan and our giant Dill harvest!


What are your favorite ways for using summer greens??


Interested in a chance to visit a beautiful CSA farm and enjoy good eats made by local chefs?  
Join REAP for this year's Day on the Farm event!  
Sunday, July 15th, 2012
11 a.m. - 3 p.m.
Crossroads Community Farm 
(formerly Primrose Community Farm)
Cross Plains, WI
Tickets can be purchased on REAP's website (at the link above)
Event also will include farm tours, chef demos, and fun kids activities.


I have always had a great time at this annual event!!