Friday, February 3, 2012

The Eggs Have It!

I'll give you fair warning.  I'm about to get on a soap box.  I'll try to keep it brief as this is something I'm fiercely passionate about.   "You are what you eat" is one of my favorite quotes and one which I firmly believe to be true.  It is also the simplest guideline we can follow when making choices about how we choose to feed ourselves.  If we eat artificially enhanced processed food like substances comprised of items we can't pronounce, we can expect that our bodies and minds will notice.  I also believe that this adage applies to the animals and plants we consume.  Why wouldn't it?  Doesn't it stand to reason that if the quality of what we eat affects us, the quality of what our food "eats" affects it?  If we consume vegetables grown in nutritionally deficient soil and supplemented with chemicals...what do you think we're going to consume when we eat those vegetables?   And how about the animals we eat?  Their bodies work much the same as ours.  If they eat nutrient deficient food and are pumped full of chemicals, what are we getting when we consume them?  Get my drift?

There is much research being done in this area as the ideals and terms once used to describe real food...organic, natural, free range, etc are being distorted and abused in an effort to keep us confused and to allow the corporations that control our food system to continue to get rich at the detriment of our physical, mental, and environmental good health.  Unfortunately, you can't always believe what you read on food labels and packaging.  It falls on our shoulders to use our own good sense as our guide. (A fun and enlightening resource is Michael Pollan's latest book, "Food Rules".)

One of my favorite examples in support of "we are what we eat" is eggs.   In 2007, Mother Earth News published a great article comparing the nutritional content of conventional versus pastured organic eggs.  A quick summation reads:
Our testing has found that, compared to official U.S. Department of Agriculture (USDA) nutrient data for commercial eggs, eggs from hens raised on pasture may contain:
• 1⁄3 less cholesterol• 1⁄4 less saturated fat• 2⁄3 more vitamin A• 2 times more omega-3 fatty acids• 3 times more vitamin E• 7 times more beta carotene & 4 to 6 times as much vitamin D 

If you have always operated under the idea that eggs are evil cholesterol ridden foods to be consumed in only the most restricted moderation, please read their article (and others like it) and go on to make better choices in your food selection so that you can once again enjoy these delicious, nutrient packed power houses.


Now for some fun!  With all of the warm weather we've had this winter I am hearing from my friends with chickens that it has been a banner winter for their egg production.  Typically with the shorter daylight and cold temperatures chickens lay fewer eggs during the winter.  These fun creatures are very much affected by temperature and daylight...just like we are!  I am fortunate to have a good friend who raises some of the happiest chickens I know.  These beautiful birds, when not in their spacious coop, are allowed to roam their country yard scratching and scavenging for bugs and whatever else they decide to eat.  Their diet is also fortified with wonderful kitchen scraps and garden waste.  These birds eat very well and it shows in the gorgeous eggs they produce.  I am always so excited to get eggs from my friend when she has some to share.  They are full of flavor, the whites are thick and sturdy, and the yolks are the prettiest golden orange I've ever seen.  Sensory evidence of how the quality of these chicken's diet affect the quality of their eggs.


My friend said her hens are producing like crazy and recently brought me 5 dozen of her amazing eggs.  I felt like I won the lottery!  I knew exactly what I was going to do with them...make pickled eggs!  Pickled eggs (also known as Tavern Eggs) are a delicacy in our great state and are most often found on the back bars of small town taverns.  Pickling is a great way to preserve many types of food, and eggs are no exception.  If you have often looked at those hazy jars with skepticism and if you've never tried a pickled egg, I challenge you to give them a try.  If you like salty, vinegary snacks, you will love these!  Pickled eggs make a handy, healthy, protein packed, delicious snack option for big and little appetites alike...particularlly if you get your eggs from a reputable farmer/egg producer. If you're not sure about the source of the eggs you're buying or the conditions in which they were produced, then ask. If the farmer, producer, or grocery store employee doesn't know or won't tell you, then you have the choice to go elsewhere. Again, the onus of our food choices falls on us. Sorry, climbing back up on my box aren't I?

My egg friend turned me on to a fun blog, Mother's Kitchen, that offers a fabulous pickled egg recipe and a new technique for hard cooking your eggs...steaming! As many of you know, the fresher the eggs, the harder they can be to peel.  It's a function of the air cell inside the egg and pH of the proteins. I usually ask my egg friend or farmers for their older eggs when I know I'm planning to hard cook them. Mother's Kitchen suggests the steaming technique she uses avoids the peeling issue no matter how fresh the eggs are. I look forward to testing this myself over time to see if I have the same luck.

Two dozen luscious eggs!


Finished product!


Hot pickled peppers I used from my pantry.


The eggs I used for this pickling were 3-4 weeks old.  The recipe was a snap to make and after sitting in my refrigerator for a minimum of 3 days, the results are delicious!  I've been eating the eggs (always with some pieces of pickled onion, pepper, and garlic from the jar) for breakfast with toast and sautéed spinach, on salads, mashed for egg salad, and just by themselves.  I would imagine they would be fantastic in a winter potato salad or mixed with some canned sardines or tuna! These eggs will be safe to eat for weeks to come, but I don't think they'll last that long.

Sliced pickled egg, garlic sautéed winter spinach, Silly Yak Dakota toast. 

Harvesting the bounty that Mother Nature gives us, in the condition it was intended, is good common sense.  Finding ways to preserve that bounty so it can be enjoyed longer or used at a later date can be a little tricky, but is often much easier than we think.  Real food offers us the best option for better health, better economics, and it just plain tastes better.

If you need some help finding farm fresh eggs here are a few ideas:
1. Get to know your neighbors.  More and more people are raising their own backyard chickens right in the middle of your city.  If your commute takes you outside the city limits keep your eyes open for farms with "eggs for sale" signs.

2. Check out your local farmer's market and talk to the farmers there to decide whose eggs you'd like to buy.  In Madison, our Dane County Farmer's Market runs year round (on Saturdays)

3.  Pasture Patterns offers an egg CSA (as do other farmer's) and they also offer their eggs in some local retail outlets.

4. Ruegsegger Farms sells their eggs through their Paoli Local Foods grocery store and they are currently offering a sale due to the abundance of their winter eggs!  (If you can't access the Facebook link, give the store a call to ask about the special....it's while the supply lasts!)

Sunday, January 29, 2012

Winter Squash: A Study in Still Life Part III

Well, here it is.  The final installment of my winter squash series.  Have you had enough?  I still have a few squashes waiting patiently in my basement for their turn to play a role on our dining table.   Winter in Wisconsin can become a little tiresome, in more ways than one.  I am grateful for the beautiful and nutritious abundance that winter squash provides us.  Finding ways to get creative with this vegetable is important to help us enjoy all it has to offer through our long winter months.  (If you have had enough of squash and aren't interested in more inspiration, please skip to the end of this post for other important information.)


The recipe I want to share is adapted from "One Bite at a Time - Nourishing Recipes for Cancer Survivors and Their Families" by Rebecca Katz.  Rebecca is a nationally recognized expert in using food as medicine.   Her book is inspiring and filled with recipes that are beneficial for everyone.  What I love about this recipe is not only that it is balanced and healthy, but also that it is extremely versatile and can be easily adapted according to what you have available in your pantry and what is in season.

Seasonal Couscous


Squash:
1/4 tsp ground cumin
1/4 tsp ground coriander
1/4 tsp sea salt
1/8 tsp ground cinnamon
2 Tbls olive oil
2 C. peeled and diced acorn squash, butternut squash, sweet potato, or a combination


Couscous:
1 C. couscous
1 Tbls olive oil
1 Tbls diced shallot
3 Tbls diced fennel
1/2 C. dried cranberries, currants, or a combination
pinch of red pepper flakes
1/4 tsp ground cumin
1/4 tsp ground coriander
1/4 tsp sea salt


To make the squash, preheat the oven to 350 degrees.


In a large bowl, mix the cumin, coriander, salt, cinnamon, and olive oil.  Toss the diced squash in the mixture to coat well.  Roast on a rimmed sheet pan for 15 minutes, or until just tender, shaking the pan once so the squash cooks evenly.  Remove from the oven, cool, and set aside.


To make the couscous, combine the couscous and 1 C. boiling water in a large bowl and immediately cover tightly with a lid.  Let it sit for 10-15 minutes, or until the moisture is absorbed.  Place the couscous on a sheet pan and spread it out with a fork, raking several times while cooling to keep the grains from clumping.


While the couscous is cooling, heat the olive oil in a large sauté pan.  Add the shallot and fennel and cook until soft.  Add the dried cranberries, red pepper flakes, cumin, coriander, and salt.  Stir well.


When the couscous has cooled, add the shallot mixture and squash.  Stir well and add a squeeze of lemon juice if desired.


Serve at room temperature.


Serves 4.


As I mentioned above, this recipe lends itself well to your creativity.  Couscous is a nutritious alternative to pasta and rice but if you want even more nutrition use Quinoa instead of couscous.  Quinoa (pronounced "Keen-wah") are edible seeds from an ancient grass.  It originates from South America and was a sacred crop of the Incas.  Quinoa is chock full of essential amino acids, making it a complete protein, one of few in the plant kingdom.  It is also high in fiber, minerals, and it is gluten free.  Kind of a wonder food really!  Quinoa is light and fluffy when cooked and its mild and slightly nutty flavor makes it a healthy substitute for white rice or couscous.  You can find Quinoa readily in any grocery store.  Simply follow the directions on the box to cook and then substitute for the cooked couscous in the recipe above.

Couscous
Red Quinoa


Nuts are a great addition to this dish as well.  You can buy black walnuts and hickory nuts locally from our farmer's markets, or harvest your own.  Pistachios, almonds, and pine nuts also make a great addition.  Be sure to toast the nuts before adding them to your dish for better flavor.

Toasting nuts:  heat dry skillet (skillet should be large enough to accommodate nuts in a single layer) over medium-high heat, add nuts, toast the nuts shaking the pan often to toast evenly.  This takes only a few minutes and the nuts can burn quickly, so do not walk away from the stove while doing this.  When nuts are lightly browned and fragrant remove from heat and skillet to stop cooking.  

Other ideas:  If you don't have shallots you can use onion and garlic.  In the spring try adding asparagus and fresh sauté greens to the mix.  Through the summer use zucchini and summer squashes instead of winter squash and toss in cherry tomatoes.  Try playing with fresh herbs as well.  Fall brings us hearty greens like spinach and kale, leeks, and we start seeing the winter squashes again.  Apples would add a fun sweet tart flavor too.  Don't be afraid to get creative!!  I have occasionally also added some feta or goat cheese and other times a simple vinaigrette.  Vom Fass is a great place to get fun oils and vinegars to brighten up any salad!

If you skipped to the end, here is the important information I was talking about. ;)
Believe it or not our winter farmer's markets are teeming with fresh produce and storage vegetables alike.  Many of our local farmer's now have hoop houses to bring us beautiful spinach and salad greens in the middle of January.  Winter eating in Wisconsin has never been so good!  For those of us who like to grow some of our own food the winter lull is about over and it's time to start our garden planning.  If you are a vegetable or flower gardener don't miss the Garden Expo coming up February 10-12th!  There are experts galore offering their advice and knowledge across a wide range of topics for bargain prices.  If growing your own food just isn't a part of your life, you must consider investing in a CSA.  Most local HMOs now even offer a reimbursement from your health insurance to help cover the cost.   Another jewel of an expo (of sorts) is MACSAC's CSA open house coming up on Sunday, March 18th.  If you have ever been curious about CSAs or are in the market and want to shop your options you should not miss this event!  

I would love to hear what seasonal dishes you are cooking up in your kitchens!  Please post in the comments. :)


Saturday, January 21, 2012

On a Mission

I was recently blessed to be part of a medical mission trip to Mexico.  It was an incredible adventure on many levels... personal, professional, and spiritual.  It was an intense four day excursion with an amazing group of people to do what we could with what we had to bring surgical services to the people of Chiapas (and nearby), Mexico.

Most of our team. Vernon is first lower right.
Our group consisted of three teams of eye surgeons and staff who performed a variety of life changing procedures on children and adults, some of whom traveled as far as 12 hours by bus for the chance to be treated.   Clinica Pena de Horeb (Rock of Horeb Clinic) is a humble facility in Cintalapa, Mexico, where the feeling of a power greater than our own is palpable.  I was nearly moved to tears daily by the incredible work we were able to do with minimal resources and by the sacrifice and appreciation of the people who allow this place to exist and those who came and sat for hours, sometimes a full 24, in the hopes of being seen and treated.  Unfortunately, with each mission campaign there are more patients who arrive than can be treated.  That fact made taking a break and getting a full night of sleep not seem quite so important.  It was a volunteer experience that moved me more than any other and one that I am already looking forward to repeating.

Potential patients waiting in the courtyard
The clinic

The clinic was started in 1991 by Vernon and Grace Odom (a retired couple from Texas) with the help of the non-profit group Good News Friends, Inc. (which they also founded).  I had the pleasure of meeting Vernon on this trip.  He is a quiet and kind Octogenarian who continues to drive from his home in Texas to the clinic in southern Mexico each year.  The clinic has become  known throughout southern Mexico as "the eye clinic" as many medical teams from the U.S. come and do hundreds of eye surgeries each year.


My role on this trip was to provide anesthesia services to some of the children and adults who came for surgery.  Sharing the details of our limited equipment and resources consistently elicits a "wow" and "oh my gosh" from every person with whom I share my story.  We had to think "outside the box" and summon the ingenuity that made McGyver famous.  In comparison, it's clear that we often accomplish so little with so much in the U.S.  The amount of waste in our country in so many facets of our lives is mind boggling.  Especially when you see what you can accomplish with so little at your disposal and to see what so many in this world live without.  I don't really have the words to describe the experience and the impact this trip had on me.  You have to see it for yourself to really understand, and I highly encourage you all to do so.
My anesthesia equipment:  there is no anesthesia machine

Dr. Mark Lucarelli, Jenny Barett RN, and me


One of my intentions for this blog was to show, through my own life adventures, how food connects us with the world.  The clinic has recently added a beautiful kitchen on to their facility in order to feed the volunteers who come there to work.  It is their way of saying "thank you". And it is the best thanks I could ever hope for.  Though we had just a short time to break for meals during our 18 hour days, the love from the kitchen couldn't be denied.  Three lovely women cooked simple homemade southern Mexican cuisine for us every day.  Their work days were nearly as long as ours and they always had smiles for us when it was meal time.

Our "cocineras" hand shredding banana bark for tamale ties
Fresh corn tortillas, salsa verde, fresh papaya, and guava were served with nearly every meal.  Two outdoor wood fired adobe ovens were used on the first day to cook up chickens (no doubt from the grounds) which would be used as our primary source of protein during our stay.  Our meals consisted of scrambled eggs with salsa, empanadas, chiles rellenos, banana leaf tamales, and chicken & black bean tostadas...all made by hand.  (They even hand shredded the dried banana tree bark that was used to tie the tamales!)
Tostada & Banana leaf tamale

Eggs, potatoes, plantains, fruit


Chiles Rellenos, rice, flan
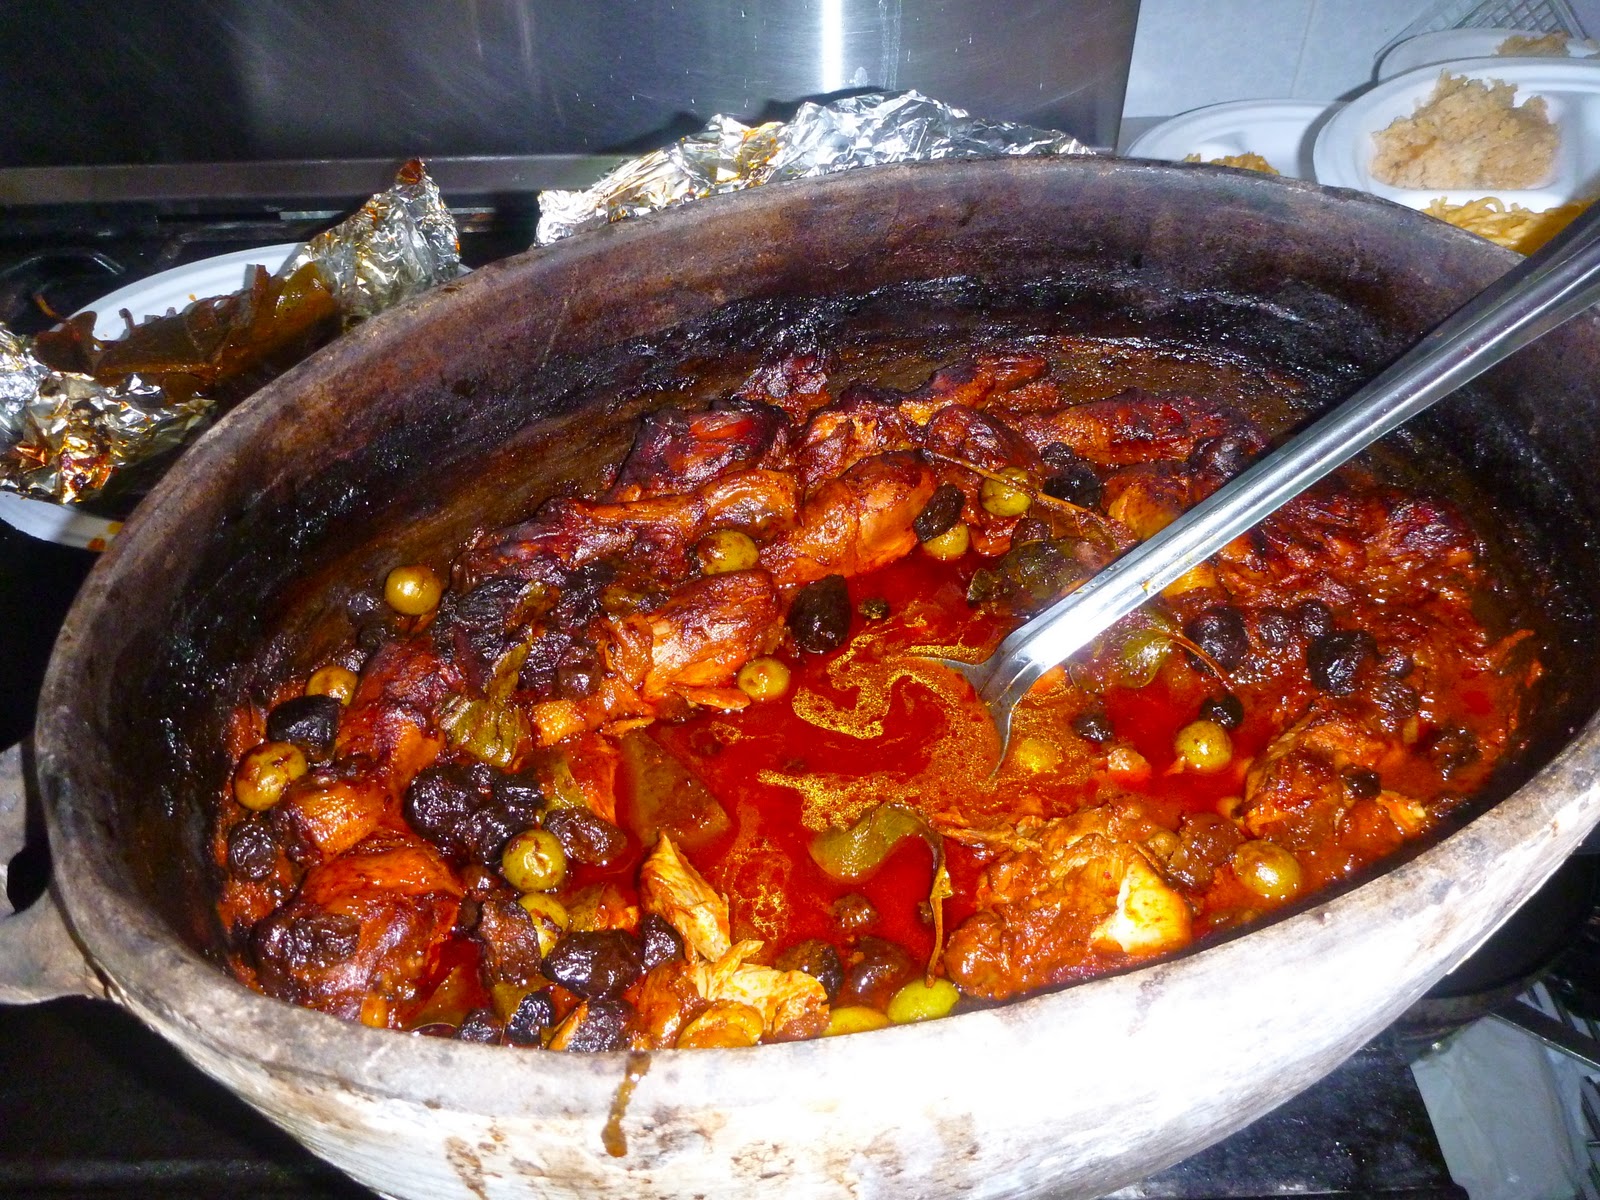
Barbacoa de Pollo


My favorite dish was served at our first lunch.  It was Barbacoa de Pollo and it was delicious!!  I was able to get a list of ingredients from one of our cocineras and subsequently found a similar recipe  online by one of my favorite chefs of Mexican cuisine, Rick Bayless.  Essentially it was chicken legs and thighs stewed for hours in the adobe oven with red wine, red wine vinegar, guajillo and cascabel chilies, dried avocado leaves, garlic, onion, prunes, green olives, cinnamon, and cloves.  I don't see some of these items on chef Bayless's recipe but they really added some fun to the plate and I will add them when I try making this myself.  The meat melted off the bones and the sauce was rich and smoky with a hint of spicy heat.  

When the ladies told me about using Avocado leaves I had to clarify that that is really what they meant.  We were speaking in Spanish after all and perhaps I misunderstood.  As a lover of avocado however, I know full well that "aguacate" is how you say "avocado" in Spanish.  I saw the leaves sitting on the counter and assumed they were some kind of large bay leaf, as that's what they looked like.  I had never heard of cooking with avocado leaves before.  I did a little calling around and found that they can be purchased at some of our local ethnic grocery stores (Yue Wah being one for sure...an adventure in itself!) here in Madison.  

Not only was the food a fun way to connect to the culture in which we found ourselves, but also to the people who live there and to each other.  Our short breaks for meals was the one time during the day when we volunteers could gather in one place to get to know one another, laugh, commiserate, relax, regroup, and reinvigorate.  It allowed us a few short minutes of fresh air as we had to walk outside briefly to get from the operating rooms to the dining room.  It was also a stark reminder of what we were doing and how needed we were.  Our walk to the dining room lead us past the covered courtyard where all of the hopeful potential patients waited (for hours and sometimes days) with empty bellies and dry mouths.  It was a loud and firm reminder to be grateful yet it came in the simplest of ways...a mere few steps taken from one door to another.  Food is so much more than just fuel for our bodies.  It is a bridge that connects us on so many levels to the world around us.

My four short days on this trip were filled with constant simple yet firm reminders to be grateful.  To be grateful that I was born in a country of such abundance, to a family who could offer me so much potential, and who raised me to make the most of that potential. With very few exceptions, we all work hard for what we have, yet we are also so very lucky to have what we have and to be able to work hard for it.  It's so easy to get lost in the constant bombardment of excess in our culture.  I intend to continue to take this trip and take part in other efforts locally to help me maintain my perspective on what is truly important in life.  I can't encourage you enough to find an opportunity to reach out and help someone in need.  It doesn't have to be in another country.  It can be as simple as crossing your street.  You may be blessed in ways you never imagined.
How cute is he?!
New friends with very tired eyes!


P.S. I would be remiss if I didn't tell you that many of the ingredients necessary for the Barbacoa can be found at the winter farmer's market!  Onions, garlic, chicken, and even tortillas! The spices and dried chiles are available at Penzey's and other ingredients can be found at our local ethnic grocery stores.  Food is a bridge between people...don't be intimidated by our ethnic grocery stores, they are exciting places to explore and if you are kind and patient you will likely be treated the same in return.

Thursday, January 5, 2012

Even Mother Nature Loves Bacon!

To kick off the new year, I need to take a break from the squash trilogy and tell you about something a little more exciting.  I made a fun food discovery at the East Side Farmer's Market late in the season last year.  (Seems strange to already refer to 2011 as "last year")  Tonight I took a stab at cooking my new found fun and these little morsels lived up to every expectation.  What are these tasty morsels?  Marrow Fat Beans.

Even if you don't like dried beans, how could you not be intrigued by one named after the most decadent part of an animal?  And as if that weren't enough to get you to try them, how about the promise that Mother Nature gave them the flavor of bacon?  Bacon?!  Beans that taste like BACON?!  These adorable snow white beans were definitely coming home with me.  How this wonderful legume ended up nearly extinct is a mystery to me.   Thanks to Slow Food's Ark of Taste and the folks at Sprouting Acres Farm, the Marrow Fat Bean has been saved from vanishing and is available for us to enjoy.

These beans have been soaked, when they are dry they are bright white.


If you're wondering what the Ark of Taste is, please allow me to introduce you.  The Ark of Taste is a modern day Noah's Ark in the food world.  It was created by Slow Food International in 1996 as a way of bringing attention to and preserving foods in danger of extinction thanks to our current monoculture food industry.  It's a really fun and interesting list that I encourage you to check out. (The U.S. even has their own list...US Slow Food Ark of Taste) I also encourage you to consider growing some of these varieties in your own garden and seeking out others to sample when you have the chance.  One of the best ways to encourage and support diversity in our food system is to create a demand by eating said diverse food!

What follows is my first attempt at cooking my special 1 cup bag of Marrow Fat Beans.  My online search for recipe ideas and information about these beans was pretty lack luster.  A recipe from Human Nature inspired the cassoulet I ended up concocting.  Interestingly enough, the Human Nature folks got their beans from Sprouting Acres Farm as well, and their recipe post was inspired by the Eat Local Challenge put on annually by Willy St Co-op (something I strongly encourage you to try when it comes around again in September 2012)

My "recipe" here is a rough guide for sure, and honestly the way I tend to cook.  The only time I follow a recipe to the letter is when I'm baking.

Marrow Fat Bean Cassoulet

1.  Because I hadn't planned ahead, I started by doing the quick soak method with the beans.  Place beans in a saucepan, cover with water, cover pan with a lid, bring to a boil for 5 minutes, remove from heat and let sit for and hour or so.  Rinse beans and cook according to your recipe.


2.  Since the limited information I found online suggested these beans required an overnight soak and a long slow cooking time, I decided to pull out my pressure cooker to speed things up.  I sautéed some sliced onion, rough chopped carrot, and cloves from an entire bulb of garlic (cloves cut in half lengthwise).

3.  Then I added a package of George's Fresh Kielbasa from Willow Creek Farm, sliced in 2 inch sections, and continued to sauté until everything was lightly browned.  (This sausage is fantastic and deserves it's own blog post.  Be sure to follow the link to read more about it!  Willy Street Co-op occasionally carries it in their meat freezer.)


4.  I added the soaked and rinsed beans, some salt, and a sizable dollop of Basil Pistou (thanks to a suggestion from my friend Jan M., I used this method for preserving my summer supply of basil and parsley...brilliant!)   I also added a light sprinkle from each of my jars of Green Bell pepper, Red Bell & Carmen pepper, and celery powders.  A method I used for preserving my some of my summer bounty by dehydrating my garden peppers and celery, then pulverizing to a coarse powder in my food processor.  These powders have been so handy!!


5.  I covered the whole lot with 8 oz vegetable broth and another cup plus of water.  I cooked the cassoulet in my pressure cooker on high for 18 minutes, then released the pressure using the rapid cold water method.

The initial result was a bit of a soupy mess and I was nearly disappointed.  It turns out the beans don't require quite as much cooking as I had anticipated.  I drained the "soup" reserving the solids to a bowl and putting the liquid back in the pan.  After a quick taste I decided the broth needed a bit of wine, so I added a solid glug or two of a dry white wine I keep in my fridge for cooking.  I brought the liquid to a boil and cooked it uncovered until it was reduced to a nice thick sauce.  I added the sauce back to the solids and voila...dinner was ready!!


The result was a delicious, creamy, soul warming cassoulet with wonderful bursts of flavor from the now fork tender kielbasa.  Now for the million dollar question...did the beans taste like bacon?  I wouldn't say they have the forceful taste of bacon, but they do have a wonderfully distinctive and delicate flavor of smoky ham.  A description of the beans I found suggests they lend themselves well to being pureed.  These beans are definitely the creamiest I've ever tasted.  A piece of crusty sourdough toast and a glass of beer made this a dinner to definitely make again!!

Happy 2012 to you all!!

Friday, December 16, 2011

Winter Squash: A Study in Still Life Part II


I just know you are sitting on the edge of your seat waiting for this next post!  Well, wait no longer my friends...here is Part II.  I had grand ambitions of getting this to you much sooner, but the craziness of the season got the best of my time.  Rather than work my way through the natural order of a meal, as I had originally intended, I'm going to play the "I'm a woman-it's my prerogative to change my mind" card and instead give you a few recipes that might be fun to play with over the holidays if you have time.  I am at least sticking to one theme, and that is Breakfast!

This fall I heard that Willy St. Coop had developed a squash smoothie for their juice bar.  I have not yet tried one, but I have heard from reliable sources that they are wonderful.  I'm a big smoothie fan, but in all honesty the thought of this type of smoothie made me wrinkle my nose just a little.  And, because it sounded a bit off, I naturally had to try to make one for myself.  Those who know me well know that I am not one to shy away from oddities in the food world.  In fact, I relish them.   The results felt a bit Willy Wonka-ish...in a very good way.  It's like pumpkin pie in a glass AND it's good for you!  Doesn't get much better than that.  I've been imbibing these creamy delicious drinks on and off for the past few weeks for breakfast.  They are satisfying and actually keep me full until nearly lunch time.  Here's what I did:

1 hard winter squash (I used pumpkin, because I love them...butternut is also a great option)
**This is the time consuming do ahead part: cut the squash in half, scoop out the seeds, roast flesh side down in a shallow baking pan (with a little water added) at 375 degrees for 30-40 minutes or until the skin is browning and the flesh is nice and soft.  Let cool enough to handle, scoop flesh in to a bowl that can be used for storage, and mash the flesh just until it's a consistent texture.  You can do this any time in advance and store covered in the refrigerator.

Squash Smoothie
Ingredients
3/4 C. mashed roasted squash (see above)
1/2C Cottage Cheese or Plain Yogurt
1 banana** (see tip below)
1 C. milk (you can use any kind of milk you want...cow, almond, soy, rice...) OR Apple Cider
a slug of real WI maple syrup (probably a tablespoon or two)
5-6 good shakes of Penzey's Baking Spice  (you can substitute some cinnamon, allspice, nutmeg, cardamom)

Directions
Combine all ingredients in a good blender and blend until smooth and frothy.
The awesome thing about smoothies of any kind is they are hard to screw up.  You can adjust flavors and ingredients until you get a product that suits you.  This recipe will make a couple of 8 oz glasses and will store in the refrigerator for a couple of days if needed.

(If you spend a good amount of time in the kitchen and have the means I highly recommend getting a VitaMix blender.  It is definitely an investment, but I think it is a versatile workhorse and worth every penny.)

**Banana tip.  I buy free trade bananas from the bargain bin at the grocery store (WSC).  When they are nice and ripe I peel them and store them in a gallon sized freezer bag in the freezer.  When I need a banana for a smoothie or other recipe that calls for mashed banana, I pull one out and nuke it for approximately 30 seconds to thaw and use.**


Crock Pot Pumpkin Steel Cut Oats
(the original recipe can be found through this link)
A co-worker just told me about this idea and I can't wait to try it.  It sounds delicious and is a smart way to feed a crowd a unique and healthy breakfast or make some convenient freezer packages for busy days ahead.  As I said, I can't wait to try it...meaning I haven't given this recipe a "go" but it looks like it should be a winner and my co-worker raved about it, so I feel comfortable sharing it with you.  Besides, we can all try it together.  Let me know how yours turns out!  I modified the recipe a touch so you can use the squash you have on hand and with the changes I will make when I give it a try. The recipe calls for pumpkin, but I think you could use any variety of hard squash.  See the Squash Smoothie recipe above for instructions on roasting your squash.

Ingredients


Optional additions:  chopped apples, raisins, chopped walnuts or hickory nuts

Directions

Combine all ingredients in slow cooker.  Cook on low 4-6 hours.  If it needs more sweetening when it's ready try adding Maple Syrup and add more milk if it's thicker than you like.  Oatmeal freezes very well.  Simply portion in to freezer safe containers.  **Remember to always label your containers because frozen food all looks the same and is nearly unrecognizable.**  When ready to eat, thaw and reheat. It is ideal to reheat oatmeal on the stove top and be sure to have more milk or water on hand.  

Makes 8 - 1 cup servings.


Sweet Potato Black Bean Burritos 
(for original recipe follow the link...below is my modified recipe)

I was recently asked to do some freezer cooking for a friend who was planning ahead for the arrival of their baby.  I've always frozen food as a preservation technique or when I have too much to eat at once, but until that moment I had never planned meals specifically to freeze for convenience later.  The research of recipes and techniques for this style of cooking was a lot of fun and this Sweet Potato Black Bean Burrito recipe inspired a breakfast burrito that has proven to be one of my favorites and something I plan to keep on hand at all times.  FYI, the cookbook I found most useful for this project is "Don't Panic - More Dinner's in the Freezer" by S. Martinez, V. Howell,  & B. Garcia.  The above recipe is a vegetarian  option and uses sweet potatoes, which can often be interchanged with hard squash in nearly every recipe.  I am a big fan of breakfast style burritos and Mexican style chorizo sausage which is why I modified this recipe to suit my taste.  I usually get my chorizo from Jordandal Farm , but I occasionally make my own using local ground pork.


Ingredients

2 Tbls cooking oil* (see tip below) or your leftover bacon grease, divided

1/2 lb Mexican style chorizo, casings removed1 onion, chopped
1 Red Bell Pepper** (see tip below), chopped 4 cloves garlic, minced
3 tablespoons chili powder
2 teaspoons ground cumin
pinch cayenne pepper, or to taste
2 cans black beans, drained and rinsed
1/2 large winter squash or 2 sweet potatoes, peeled and cubed

1 Tbls butter
6 Eggs (from a friend, farm neighbor, or farmer's market...pastured eggs taste better, are healthier, and are worth the cost) 12 (10 inch) flour tortillas
½ to one pound Cheddar or Monterey Jack cheese, shredded


Directions


Heat large heavy skillet over medium high heat.  Add 1 Tbls oil or fat, when hot add ground chorizo.  Fry in skillet stirring often to break up in to small pieces.  When sausage is browned remove to paper towel lined plate, reserving fat in skillet, and set sausage aside.  


Return skillet to stove over medium heat.  Add another 1 Tbls of oil or fat, when hot add chopped onion and bell pepper.  Saute until beginning to soften, scrape up any crispy bits left in the pan from cooking the sausage.  Add a little water if needed to help loosen any stubborn bits.  Add garlic, spices, and squash.  Cook, stirring often, to combine for 2 minutes.  Cover skillet and continue to cook, stirring often, until squash is soft but not mushy, approx. 8-10 minutes.  While waiting crack eggs in to bowl and whisk briefly with a fork to combine.  Season with salt & pepper.  Remove lid, add black beans, and cook another couple of minutes to heat beans through and evaporate collected liquid. Remove contents of skillet to large bowl.  Add reserved chorizo to this bowl as well, stir to combine. Taste and adjust seasonings as needed. 


Return skillet to medium heat, add 1 Tbls butter.  When butter is foaming,  add whisked eggs and cook as scrambled until moist and glistening...they will seem undercooked.   Dump scrambled eggs in to bowl with black bean mixture, stir gently to combine.  Do not allow the eggs to brown or cook until dry or "done".  At that point they will be overcooked and rubbery. Check out this great video on cooking perfect scrambled eggs.  


Assembly

If you plan to freeze the burritos, allow filling to cool completely before assembly.  This is important! If you wan to eat them right away, carefully assemble with the hot filling.  Working with one tortilla at a time (they will be more pliable if room temperature or slightly warm...if you will eat them right away you can actually pre-heat each tortilla in a hot skillet first).  Lay tortilla on work surface.  Place 1/4 C. or so of filling in a line down the middle of tortilla (from top to bottom) leaving a good inch of space at each end.  Top with a couple tablespoons of shredded cheese.  Fold right side of tortilla over filling, fold top and bottom of tortilla next, and finish with left side being sure corners are tucked in and filling is completely contained.  Set aside seam side down.  Repeat until tortillas are used up. (My photos were taken after the fact, so I apologize that they don't follow my directions exactly, but they are still a useful guide)


For freezing: wrap each burrito in plastic wrap, followed by wrapping tightly in foil.  Label each burrito with a marker and freeze.


To eat from freezer:  if you plan ahead you can thaw them and heat in oven or microwave.  I never do that, so when I need to grab breakfast in a hurry I completely unwrap the frozen burrito (I save the clean plastic wrap & foil for another use), wrap the burrito in a paper towel, and microwave for 1 minute 30 seconds on 70% power.  I turn the burrito over and microwave another 1 minute 30 seconds on 70% power.  They are always perfectly reheated when I do this.  I top them with some of my canned salsa and enjoy.  These burritos are really tasty and satisfying!


*Cooking Oil tip:  I use Olive oil (not Extra Virgin) or Grape Seed oil for cooking; Sunflower Oil is being produced and sold locally from Driftless Organics and is a nice option as well.


**Bell Pepper tip:  Bell Peppers in their off season are expensive and have to be shipped to us from far off places.  During their peak season (late summer in our area), load up on these beautiful and tasty peppers from your local farmer's market.  Give them a wash, remove the stem and seeds, and chop or leave in large sections.  Place pepper pieces in freezer bags or containers and put in the freezer for use throughout the year.  When thawed they will lose their crunch, so won't be suitable for eating raw, but they retain their color and flavor so will be perfect for all of your cooked dishes.  


Whew!  There is a lot of information here.  But fun and delicious ideas for using your supply of winter squash.  Please let me know if you give these recipes a try.  I would also love to hear what your favorite uses for winter squash might be!  


Stay tuned for Part III where I'll share a versatile entree recipe that is great as a salad, side dish, or main course.  


One final thing I have to share.  I was very excited when Terese Allen and Joan Peterson released the first edition of their "Wisconsin Local Foods Journal" earlier this year.  I was even more excited to get my hands on a copy and saw what an amazing resource it really is.  The icing on the cake is that the proceeds from the book sales go to support REAP Food Group's food and sustainability programs.  As a leader on the board of Slow Food Madison, supporting local food groups who focus on sustaining our local food system is a priority for me.  I am such a fan of these women and this book is my favorite gift to give this year.  I anticipate it will become an annual favorite for years to come.

Happy holidays to you all and best wishes in the coming year!!


Tuesday, December 13, 2011

Winter Squash: A Study in Still Life part I

Winter squash is like a little ray of sunshine.  The varieties available make the fall farmer's markets look like a veritable candy store with the beautiful oranges, yellows, and greens that usher in our fall season.   Acorn, Butternut, Delicata, Hubbard, Spaghetti, Pie Pumpkin...just to name a few.  When these gems are stored properly (cool, dark, with moderate humidity...I keep mine in a single layer in my basement) they can feed us well in to our long Wisconsin winter.  They are loaded with vitamins and minerals and each variety has its own flavor and texture profile.

As with their Summer counterparts, Winter squash is very easy to grow.  If you have the space, a squash vine can give you quite a bang for your buck on the dinner table.  Or, if you have a CSA (like I did this year, thank you Primrose Community Farm!) you might have a stash of squash in your basement that can seem a little daunting.  Although we all love the familiar baked squash with butter and brown sugar there are all kinds of fun ways to enjoy this versatile vegetable.

Before I get in to the recipe portion of this post let's talk about the challenges to cooking with winter squash...cutting and peeling.  As we all know, winter squash comes in many shapes and sizes and has a very hard outer skin.  A large sharp knife and an easy to hold sharp vegetable peeler will make your life a little easier.  This is probably one reason that folks generally opt for the oven roasted squash dish I mentioned above.  Cutting the squash in half, baking, and scooping out soft flesh is definitely the easy way to go...not that there's anything wrong with that.

Peeling a smooth variety, such as Butternut, isn't as bad as dealing with a grooved squash like Acorn.  A tip I got from a friend is to pop the whole squash (uncut & unvented) in to the microwave for a few minutes.  This softens the skin just a bit and makes it easier to peel.  A smooth squash like Butternut is easiest to peel if you leave it whole and use a vegetable peeler.  (Please keep in mind, this is based on my personal experience and not some other kind of culinary edict)

There are a couple of ways to deal with the grooved squashes.

  • Cut in half crosswise and scoop out seeds.  Microwave for 4 minutes or so on high to soften the peel and flesh a touch.  Cut halves in to wedges following the indents already present on the squash.  Peel each wedge with a vegetable peeler

OR
  • Cut squash in half and scoop seeds.  Continue to cut each half in to 1 inch slices parallel to the first cut edge.  You will end up with rings.  Lay each ring on the cutting board and trim the peel from the flesh with the tip of a knife. (Sorry, bad blogger...I don't have a photo of this.  You'll have to use your imagination.)


One last thing to keep in mind is that once cooked and softened, nearly all squash peels are edible and may go completely unnoticed in your dish.  In some cases it can even add some decorative flair.

Let's get cooking!  Shall we start at the beginning of the meal hierarchy with soup?  Here is one of a few recipes that are my own.

Al's Squash Soup   
(Who is Al?  Just another nick-name folks)

1 large winter squash - halved and seeded
1/2 lb bacon or pancetta - diced
1 med onion - chopped
fresh Sage (large bunch) - leaves picked and stems discarded
2 Tbls fresh Thyme - leaves removed and stems discarded
1/2 C. Apple Cider
1 small bulb garlic
2-3 C. Chicken stock
1/4 C. Sour Cream or Creme Fraiche

Optional toppings:
crumbled Blue cheese
Walnuts roasted and finely chopped
Splash of an aged Balsamic Vinegar

1. Preheat oven to 375 degrees. Rub olive oil over squash flesh and season with salt.  Place in roasting pan flesh side down.   Place garlic bulb on a piece of foil, drizzle with olive oil, and wrap loosely with the foil.  Add garlic package to roasting pan with squash.  Cook until squash flesh is soft and skin easily pierced. (Approx 40 minutes)
2.  Check garlic after approx 30 minutes.  If golden and soft remove from oven while squash continues to cook.
3.  Meanwhile, pan fry the pancetta/bacon in a skillet over medium heat until brown and nearly crisp.  Remove from pan and drain on paper towel.
4.  Pour all but 2 Tbls of the rendered fat in to your BGB (Bacon Grease Bowl- everyone should have one in the fridge for reserved bacon grease).  Return the skillet with 2 Tbls bacon grease to the heat.  Fry sage leaves in hot bacon grease, add onion & Thyme and reduce heat to medium-low.  Continue cooking, stirring occasionally, until caramelized.  (approx 20 minutes)
5.  When squash is ready remove from oven. Scoop soft flesh out away from skin and put in food processor.  Add roasted garlic (by squeezing softened cloves from skins) and onion-herb mixture.  Process until smooth. Pour all contents in to a large saucepan over medium heat.  Add apple cider and chicken stock until you reach desired consistency and soup is heated through.  Taste and adjust salt to your liking...keep in mind that crispy bacon will add a bit of salt to the soup.
6.  To serve: spoon soup in to warmed bowls.  Top with a small dollop of sour cream/creme fraiche, crispy bacon and any combination of remaining optional toppings.

Makes approx 8 C.

That's all for now.  Stay tuned for more!


Sunday, December 4, 2011

The 3-way Chili

In our house my husband reveres chili with passionate monogamy.  He is the only one who makes it and it has to be done in a very specific way.  Bastardizing it with pasta of any kind is near sacrilege.  (Interesting, because he's from Green Bay which touts its own brand of chili that includes spaghetti...which is how his mom makes it!)

When my Cincinnati friends told me about their chili that can be enjoyed as 3, 4, or 5-way, it caught my attention.  What on earth could this kinky, open minded chili be about?  Although it can be enjoyed as 3-way, it turns out that this chili with a cult following, also must be done in a very specific way.

If you've never heard of it, Skyline Chili is a chain of restaurants in Cincinnati, OH, founded in 1949 by a Greek immigrant.  The chili is a fine textured meat sauce with a very distinct flavor profile.  Although the official recipe is a highly guarded family secret, most agree that the sauce must contain chocolate and cinnamon which are common spices in Greek cuisine.  Because of Skyline's history and popularity, "Skyline" and "Cincinnati" style chili have become synonymous.

So what's this 3-way all about?  Cincinnati chili is traditionally enjoyed served over spaghetti noodles and topped with lots of finely shredded cheddar cheese. (Chili + noodles + cheese = three, get it?)  Sorry to disappoint any other notions of enjoying 3-way chili...though I can't imagine what that would even look like.  Add Red beans OR onions and now you have it 4-way.  Add both red beans AND onions, and now you have it 5-way.  If you can believe it there is even more to this madness.  Once plated it is common to squirt hot sauce across the top and cover the whole mess with salty oyster crackers.  Check out the Webner House blog for all of the specifics.

After consulting a friend of mine from Cincinnati, here is the recipe I use to make this wonderfully unique chili.  It is inspired by Skyline Chili Copycat from Food.com.

1 Qt water
2 lbs ground beef
2 med onions, chopped
5 cloves garlic, minced
1 pint (16 oz) tomato sauce
2 Tbls cider vinegar
1 Tbls worcestershire sauce
1/4 tsp (rounded) ground black pepper
1/4 tsp ground allspice
1/4 tsp ground cloves
1 bay leaf
1 tsp salt
2 tsp ground cinnamon
1 tsp ground cumin
1/2 to 1 tsp cayenne or ground red pepper
1/2 oz grated unsweetened chocolate or 3/4 Tbls unsweetened cocoa


Finely shredded cheddar cheese
1 lb spaghetti

Optional toppings:
Red Kidney beans
minced onion
oyster crackers


1.  Fill saucepan with water.  Crumble raw ground beef in to pan of water. (Really, trust me).  It's okay if it's in clumps.  Bring water & meat to a boil, stirring occasionally.  Reduce heat to a simmer.
2.  Add all remaining ingredients (except cheese & pasta).  Simmer uncovered 2-2 1/2 hours.  Remove bay leaf, skim off visible fat, and cool.  Best if left in refrigerator overnight before serving.  
I just added the beans right in to the chili before serving.

When ready to eat.  Cook up a pot of spaghetti noodles to al dente and drain.  Reheat chili.  Pile noodles on plate, top with chili sauce, followed by your choice of optional kidney beans and onion.  Finish off with a mound of finely shredded cheddar cheese.  Proceed with hot sauce and oyster crackers if you so desire and dig in!   

This chili can also be enjoyed in the same manner on hot dogs or over baked potatoes.  We enjoyed ours with a side of Stella's Hot Spicy Cheese rolls!


I make this chili when I have time to cook ahead and then portion it into freezer bags for use at a later date.  Makes it a quick and easy meal when you are short on time.  

**An important thing for you to know about me is that I am passionate about supporting local farmers and food producers.  Whenever I can I source my ingredients locally and will either list an item as such and include a link to the producer or put a list at the end of the post with the folks I bought my ingredients from.  If you ever want to know exactly where to get a food item locally, please don't hesitate to ask.  I would encourage you to give serious consideration to where your money is going and who you are supporting when you buy your food.  A smaller visible price tag on the front end is often NOT without a higher hidden price tag on the back end.  Another topic for another time, but if you want to know more in a fun way...watch Food, Inc.    (It's available on Netflix.)**

My sources for this meal: